
How to Design a 3D Printer: Custom Builds and Component Selection
Table of Contents
how to design a 3d printer – The moment I first flipped the power switch on my custom-built 3D printer, I held my breath. It wasn’t just a machine; it was a physical manifestation of months of learning, designing, and troubleshooting. Unlike buying a pre-made printer where you’re a passive user, designing your own forces you to understand every screw, belt, and electron. My first attempt—a shaky wooden frame I nicknamed “The Wobbler”—taught me more about rigidity and tolerance than any engineering textbook. I learned that a frame that flexes by even a millimeter translates to visible artifacts on prints. I discovered that cheap stepper motors lack the torque for high-speed moves. But when I finally printed a perfect calibration cube on a machine I designed from scratch, the satisfaction was incomparable. Designing a 3D printer isn’t just about saving money (often you won’t); it’s about building a machine perfectly tailored to your specific needs, whether that’s extreme speed, massive build volume, or exotic material capability.
Moving from learning how to design for 3D printing to designing the printer itself represents the ultimate level of mastery. You stop accepting the limitations of commercial machines and start engineering your own solutions. This process involves critical decisions at every stage: choosing a motion system (Cartesian, CoreXY, or Delta) that defines your printer’s character, designing a frame that resists vibration and torque, selecting electronic components that deliver precise control, and configuring firmware to orchestrate the entire symphony. As explored in our pillar guide, understanding the printing process is key, but here we reverse the equation: instead of designing a model to fit the printer’s constraints, we design the printer to remove those constraints.
This comprehensive guide walks you through the engineering journey of how to design a 3D printer, from selecting the right kinematics architecture to sourcing specific components like NEMA 17 motors and 32-bit controller boards. We will cover frame design principles for maximum rigidity, the pros and cons of different motion systems, essential electronics selection, and the critical role of firmware configuration. Whether you’re aiming to build a high-speed CoreXY Voron-style machine, a massive large-format printer, or simply want to understand the mechanics behind the magic, this guide provides the roadmap for your custom build.
Choosing Your Motion System Architecture
The most fundamental decision in designing a 3D printer is selecting the motion system—the mechanical architecture determining how the print head moves relative to the bed.

Cartesian: The Classic Standard
How it works: In the most common “bed slinger” design (like the Ender 3), the bed moves back and forth (Y-axis), while the print head moves left and right (X-axis) and up and down (Z-axis). Another variation allows the bed to move only in Z while the head moves in X and Y.
Pros: Simplest to design and build, easy to troubleshoot, excellent community support, cost-effective.
Cons: The heavy moving bed limits speed and acceleration (inertia issues). Tall prints on a moving bed can wobble.
Best for: Beginners, budget builds, and reliable workhorses.
CoreXY: Speed and Precision
How it works: The bed typically moves only vertically (Z-axis). The print head moves in X and Y driven by a complex belt system where two stationary motors work together.
Pros: Stationary motors mean less moving mass on the gantry, allowing for incredible speeds and accelerations. Very space-efficient (compact footprint for large build volume).
Cons: Complex belt routing requires precise assembly; more difficult to troubleshoot belt tension issues.
Best for: High-speed printing, enclosed ABS/ASA printers, and enthusiasts seeking performance.
Delta: Speed and Verticality
How it works: Three vertical arms connected to a central effector move the print head. The bed is stationary.
Pros: Extremely low moving mass allows for the fastest travel speeds. Excellent for tall, cylindrical objects (vases).
Cons: Complex mathematics (handled by firmware) means calibration can be tricky. Resolution varies across the bed (lower at edges). Inefficient use of horizontal space.
Best for: Fast prototyping, tall prints, and visual “cool factor”.
Designing the Frame for Rigidity
A 3D printer is a robot that moves precisely; a wobbly frame destroys that precision.
Material Selection: Aluminum Extrusions
2020 and 2040 Profiles: The standard for custom printers is T-slot aluminum extrusion (usually 20mm x 20mm or 20mm x 40mm profiles). They are straight, rigid, and easy to bolt together using T-nuts and brackets.
Why not wood or acrylic? Wood warps with humidity; acrylic cracks and flexes. For a machine operating with sub-millimeter precision, aluminum provides the necessary stability.
Structural Design Principles
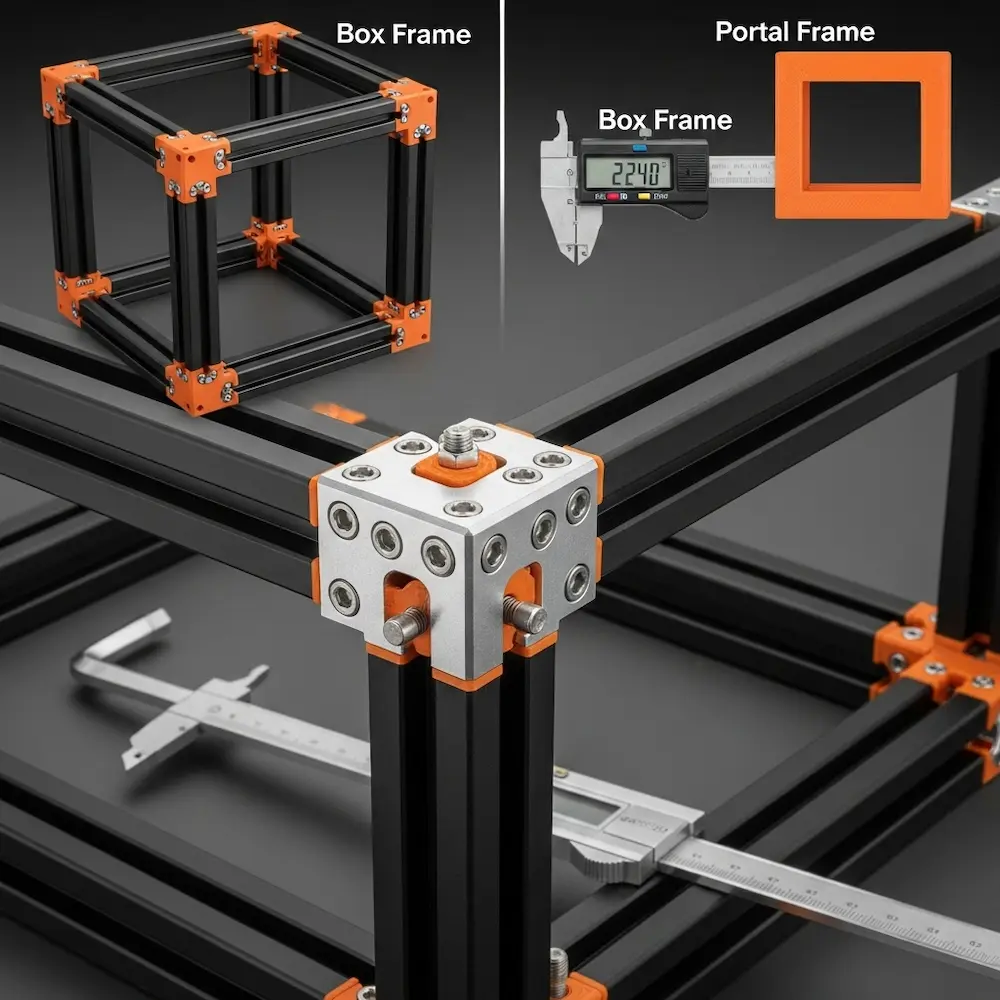
Triangulation: As discussed in RepRap’s rigidity guide, squares distort into parallelograms under load. Adding diagonal braces (triangles) or corner gussets significantly stiffens the frame.
Box vs. Portal: A full box frame (cube) is inherently more rigid than an open portal frame (like an upside-down T). If designing a high-speed machine, a box frame is essential to contain vibration.
Custom Printed Parts: You will need to design custom brackets and mounts. Using your knowledge from how to make 3D print designs, ensure these parts have sufficient wall thickness (3mm+) and high infill (40%+) to act as structural components.
Selecting Core Components
With the frame designed, you need to populate it with the muscles and brains of the operation.
Motion Components: Motors and Rails
Stepper Motors: The NEMA 17 is the industry standard. Look for motors with high holding torque (typically 40-50 N·cm or ~60 oz-in) for X and Y axes. For the extruder, a smaller “pancake” stepper saves weight.
Linear Motion:
- Linear Rods & Bearings (LM8UU): Cheap and effective, but rods can flex if too long.
- V-Slot Wheels: Rollers running directly on aluminum extrusions. Quiet and cheap, but wheels wear out over time.
- Linear Rails (MGN12): The professional choice. Expensive but offer extreme precision, rigidity, and longevity.
Extrusion System: Direct Drive vs. Bowden
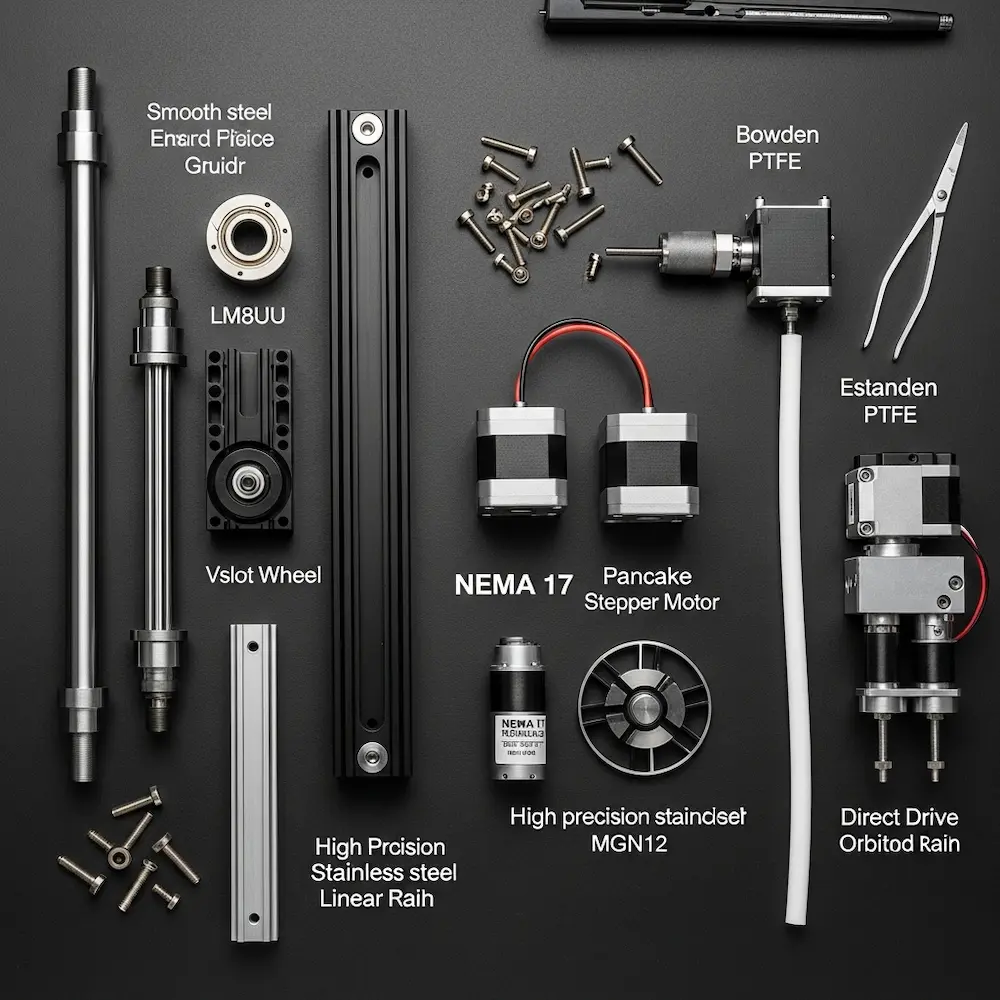
Bowden: The extruder motor is mounted on the frame, pushing filament through a long tube to the hotend. Lightweight print head allows faster speeds, but retraction is less precise (stringing issues).
Direct Drive: The motor is mounted directly on top of the hotend. Better control for flexible filaments (TPU) and precise retraction, but adds weight to the moving head. Modern lightweight extruders (like the Orbiter or Sherpa Mini) make direct drive the preferred choice for high-performance custom builds.
Electronics: The Brain
Mainboard: Choose a 32-bit board (like BigTreeTech SKR or Fysetc Spider) over older 8-bit boards. 32-bit processors handle complex kinematics (like CoreXY or Delta) without stuttering.
Stepper Drivers: Silent drivers like TMC2209 are essential. They make the motors whisper-quiet and offer “sensorless homing” features.
Power Supply: A reliable 24V PSU (like Mean Well) heats up the bed and nozzle faster and more efficiently than 12V systems.
Firmware and Configuration
Hardware is useless without software to drive it. Configuring firmware is where you define your printer’s physical reality.
Marlin: The traditional choice. It runs directly on the mainboard. It’s robust and feature-rich but requires recompiling and re-flashing the board to change settings.
Klipper: The modern favorite for custom builds. It offloads calculations to a Raspberry Pi (or similar), allowing for complex motion planning and “Input Shaping” to cancel out vibrations. Configuration is done via a simple text file, making tuning much faster.
Conclusion
Designing a 3D printer is a journey that transforms your relationship with manufacturing. You move from asking “how do I print this?” to “how do I build a machine that can print this?”. By selecting the right architecture—perhaps a rigid CoreXY for speed—designing a robust aluminum frame, and choosing precise components like linear rails and 32-bit electronics, you create a tool that rivals or exceeds commercial machines costing five times as much.
This guide completes our comprehensive series on 3D printing design. You now have the full picture:
- The Big Picture: How to design for 3D printing gave you the fundamental mindset.
- The Tools: How to design 3D models for printing equipped you with software skills.
- The Rules: How to make 3D print designs taught you the physical constraints.
- The Advanced: How to design your own 3D prints pushed into mechanisms and customization.
- The Machine: And now, you know how to build the printer itself.
Whether you build a simple Cartesian workhorse or a high-speed engineering marvel, the skills you’ve gained across these five articles empower you to turn any digital idea into physical reality.


